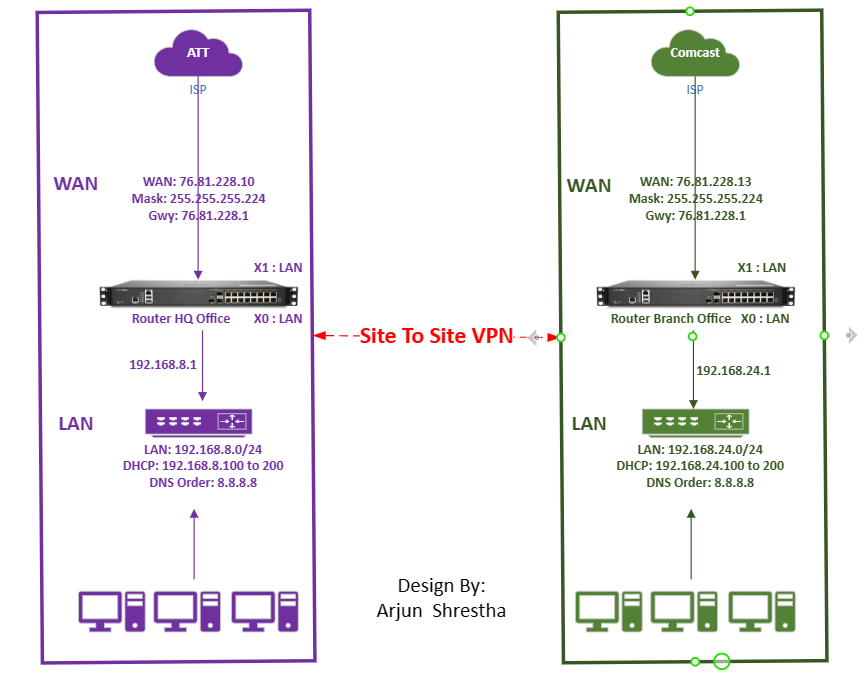
SonicWall Router - Assign DHCP Static IP to Windows 10PC1 and Windows 11PC1
SonicWALL- he task is done in LAB Computer or inside Org)
Assign DHCP Static IP to Windows 10PC1 and Windows 11PC1

Establish a connection to the VPN for accessing the laboratory.
Turn off, Cisco router and Arista-untangle router.
Open any computer (windows 11 or windows 10)
Open Microsoft Edge > type 192.168.168.168 (if your sonicWall router is first time running - default IP)
Click on here link > click on “advanced” button and
And finally , click on continue to 192.168.168.168(unsafe).
Type default credential of SonicWall:
Username: admin
Password : password
Login
You will see this interface:


Now click on Manage menu > Network > Interfaces

Now manage WAN:
In WAN, we have to

Now To Assign DHCP Static IP to Windows 10PC1 and Windows 11PC1
Open Windows 10PC1 from lab
Open command line
Type ipconfig/release
Type ipconfig/renew
Type ipconfig/ all and check the Ethernet address OR Physical Address: 00-50-56-B5-C4-72
In SonicWall router, click on Manage > Interface> DHCP server
Click on Add Static button and type below information on General and DNS fields.
And click on OK.


You will see DHCPv4 Server Lease Scopes like below (you can give static ip to another Windows also in the same way.)

For dynamic IP Scope:
Click on Manage > Network > DHCP server > Add Dynamic
Give the Start and end range and


THE END
Comments